Sunday 24 April 2011

April build update 2

Back again for another update had rather a productive month, after altering the body to suit the new vents i have been working on the engine bay so that i can fit the vents in properly. i am in the very fortunate position that i have access to an original cobra from time to time so i am able to take plenty of pictures and just make sure I'm being as correct as possible unfortunately the car is a MK 1 with a Ford 289 but still has many of the same features as the later 427 that I'm trying to recreate.
 As you can see from the picture below the top of a cobra foot well is white and is made of fibreglass my next job in the engine bay was to recreate this.  

Real Cobra Engine bay


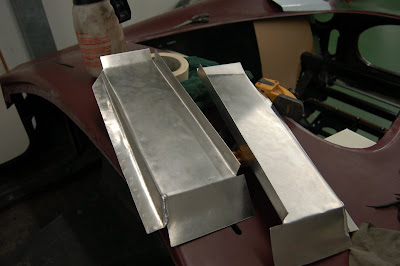
Unfortunately the dax footwell is not sloped as it is in the real thing but i can at least get the right look with in reason, the gel coat on my body was in no way good enough to just paint white so i had to make some aluminium panels to go on to the top and then give them a lick of paint.

The panels in primer

The finished items


Hopfully as the engine bay progresses with the aluminium cladding as it were, they should begin to look as close as possible to the picture above of the real thing, I even intend to fit a reproduction chassis plate.

 The next stage was to make 2 cover plates to go over some extensions in the side of the footwell pod the reason they are there is so the top of the foot well can be angled to give a little room for the headers i think but anyway another of those really tricky jobs but i think the out come will be really nice when the panels are fitted over the top and riveted into place .

The panels ready to go in the car

The finished item

 As you can see a small amount of welding was required on these panels but most of the rest will be riveted just as an original would have been.

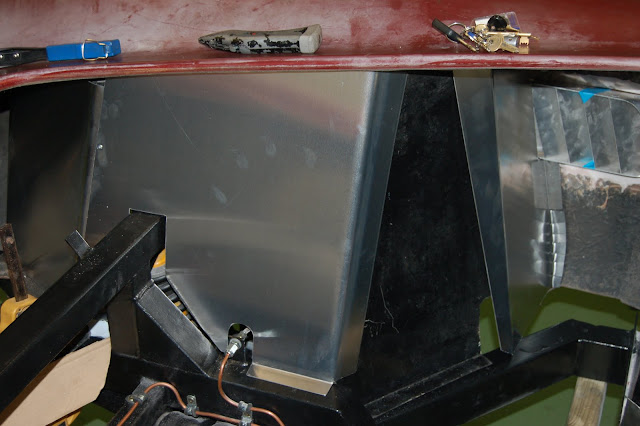
 Time to get started with the main panels in the front of the engine bay now this will be a long process as i will have to make templates for all the panels as I'm going along then cut the aluminium then fold it shape it glue it with tiger seal and then finally rivet the panels together.

Template being made

The first of the panels gos in to the car

The finished passenger side

The finished drivers side

 I think so far this looks really great a huge amount of effort to make all these panels,you can buy them from dax but 1 they are stainless so not correct cobras were aluminium and 2 they cost £560 plus vat. so far i have bought 2 8x4 sheets of 16 gauge aluminum delivered with the vat was only £117 quite a difference and i think the effect of the rivets is awesome .

 i plan to get more panel work done this Friday so i will try and get another update done asap

April Engine update


Very exciting my new well second hand heads have arived and the very butiful inlet manifold ready for the quad IDA Webbers carbs. Cant wait for the rest 


April Build update


April Already i don't think I'm going to be finished by the summer. LOL

 Now that the body is on the chassis and all glued and bolted down its time to get on with fitting out the car i am starting with the outside getting all the doors fitted bonnet boot side vents and so on, this is so that all the holes can be cut in the fibre glass,  then as I'm going along i can put the aluminium paneling over the top to create the look I'm wanting, although i will be concentrating with the out side I'm going to be lining out the engine bay the boot and the gear box tunnel as part of this stage.

 Below is a picture of the two side vents i have bought they are a recreation of an original set of vents made/sold by Europa spares i decided that i didn't like the dax option so i went for the more original look.

Cobra side vents


Vent opening

As you can see from the picture above dax have very nicely shaped an opening for you to fit a stainless item straight into but as i have already said i decided i liked a more original look.


To be able to fit the new vents I had to cut out the return from the fibre glass and then add some new fibre glass to make the hole 2/3mm smaller.
  This was made even harder by the two sides of the body not being equal inside the engine bay so on one side i have had to cut out some of the wheel arch and on the passenger side i have had to cut away some of the foot well so a few repairs will have to be done the strengthen the body back up before the IVA Test.


The next stage was to use some filler to fill in the gaps both on the inside and out that the fibreglass doesn't get perfectly smooth, at this stage it is worth noting that i needed to sand both inside the body as well as the out side,the aim is to get a very thin area for the vent to sit in side of the body, because I'm trying to get an original look it was important to remember that the real cobras vent were fitted in much the same way but they were up against the inside of an aluminium panel not a fibre glass one it is there for impossible to get the fibre glass as thin as the aluminium would have been but you can get a reasonable finish if you take your time.
 using a template to mark out where the vent will fit and of course the size the hole need to be taken out to leaving just enough so the vent sat just nice and flush with the inside edge.


Finished hole ready for paint

All primed up ready for the vent.


 Vents are finally ready to be fitted they will eventually be held in place by the panelling in side the engine bay, as I'm sure you will agree i think they were worth all the hard work they look awesome and when they are painted i think they will look even better.